Introduction to Databases in Python
网页在这个地方。主要讲连接数据库和使用sql语言,Python中主要使用包sqlalchemy 1。 网站主要都是英文的,看起来慢,这个相当于一个纲要,可以快速理解主要的知识点,仅此而已。
Connecting to your Database | Python
这个地方要搞清楚怎么连接数据库在Python中。
Engines and Connection Strings | Python
理解下里面每个attribute的含义。
Alright, it’s time to create your first engine! An engine is just a common interface to a database, and the information it requires to connect to one is contained in a connection string, such as
sqlite:///census_nyc.sqlite. Here,sqliteis the database driver, whilecensus_nyc.sqliteis a SQLite file contained in the local directory.
举例sqlite:///census_nyc.sqlite中,sqlite就是一个数据库,census_nyc.sqlite是一个数据库本地文件。
# Import create_engine
from sqlalchemy import create_engine

# Create an engine that connects to the census.sqlite file: engine
engine = create_engine('sqlite:///census.sqlite')

# Print table names
print(engine.table_names())
这里.table_names()是反馈表名。
<script.py> output:
    ['census', 'state_fact']
表示有两个表。
Autoloading Tables from a Database | Python
In [1]: # Import Table
        from sqlalchemy import Table

        # Reflect census table from the engine: census
        census = Table('census', metadata, autoload=True, autoload_with=engine)

        # Print census table metadata
        print(repr(census))
Table('census', MetaData(bind=None), Column('state', VARCHAR(length=30), table=<census>), Column('sex', VARCHAR(length=1), table=<census>), Column('age', INTEGER(), table=<census>), Column('pop2000', INTEGER(), table=<census>), Column('pop2008', INTEGER(), table=<census>), schema=None)
repr会给出具体的信息,比如Column。
$\Box$ 怎么在本地开始练习呢?
Viewing Table Details | Python
census.columns.keys()would return a list of column names of thecensustable.
In [3]: # Print the column names
        print(census.columns.keys())
['state', 'sex', 'age', 'pop2000', 'pop2008']

In [4]: # Print full table metadata
        print(repr(metadata.tables['census']))
Table('census', MetaData(bind=None), Column('state', VARCHAR(length=30), table=<census>), Column('sex', VARCHAR(length=1), table=<census>), Column('age', INTEGER(), table=<census>), Column('pop2000', INTEGER(), table=<census>), Column('pop2008', INTEGER(), table=<census>), schema=None)
Selecting data from a Table: raw SQL | Python
假设connection是连接好的object,
.execute()method is a ResultProxy.
.execute()中间写执行的SQL代码
.fetchall()负责把结果显示出来
总体为
# Build select statement for census table: stmt
stmt = 'select * from census'

# Execute the statement and fetch the results: results
results = connection.execute(stmt).fetchall()

# Print Results
print(results)
Selecting data from a Table with SQLAlchemy | Python
select([census])等价于'select * from census'
connection 是链接好的类似于服务器的东西。
connection.execute(...).fetchall()
Handling a ResultSet | Python
复习一下。
Recall the differences between a ResultProxy and a ResultSet:
ResultProxy: The object returned by the
.execute()method. It can be used in a variety of ways to get the data returned by the query.
ResultSet: The actual data asked for in the query when using a fetch method such as
.fetchall()on a ResultProxy.
没法本地操作很无聊啊。
sqlalchemy内化了SQL语言,因此不需要再string的语言了,很麻烦,很容易错,还不容易debug。
Connecting to a PostgreSQL Database | Python
# Import create_engine function
from sqlalchemy import create_engine

# Create an engine to the census database
engine = create_engine('postgresql+psycopg2://student:datacamp@postgresql.csrrinzqubik.us-east-1.rds.amazonaws.com:5432/census')

# Use the .table_names() method on the engine to print the table names
print(engine.table_names())
答案是
['census', 'state_fact', 'data', 'users']
There are three components to the connection string in this exercise:
- the dialect and driver (
'postgresql+psycopg2://'), - followed by the username and password (
'student:datacamp'), - followed by the host and port (
'@postgresql.csrrinzqubik.us-east-1.rds.amazonaws.com:5432/'), - and finally, the database name (
'census').
Filter data selected from a Table - Simple | Python
where条件的使用。 例如,stmt = stmt.where(census.columns.state == 'New York')。
stmt = stmt.where(census.columns.state.in_(states))
in_()可以这么用!
Great work! Along with
in_, you can also use methods likeand_ ``any_to create more powerfulwhere()clauses.
In [2]: states
Out[2]: ['New York', 'California', 'Texas']
Filter data selected from a Table - Advanced | Python
stmt([census]).where(
  and_(census.columns.state == 'New York',
       or_(census.columns.age == 21,
          census.columns.age == 37
         )
      )
  )
其实这个地方的and_很好理解, 在sQL中我们用where A and B, 在Python中我们把where()放在外面,and_从中间提前到前面而已。
Ordering in Descending Order by a Single Column | Python
stmt.order_by(desc(table.columns.column_name))这里的order_by(desc(和R的dplyr非常类似。
Counting Distinct Data | Python
又是类SQL语言,因此非常好理解。
.fetchall()and.first()used on a ResultProxy to get the results. The ResultProxy also has a method called.scalar()for getting just the value of a query that returns only one row and column.
Count of Records by State | Python
# Import func
from sqlalchemy import func

# Build a query to select the state and count of ages by state: stmt
stmt = select([census.columns.state, func.count(census.columns.age)])

# Group stmt by state
stmt = stmt.group_by(census.columns.state)

# Execute the statement and store all the records: results
results = connection.execute(stmt).fetchall()

# Print results
print(results)

# Print the keys/column names of the results returned
print(results[0].keys())
类似于SQL语言,先写select语言select state, count(age), 再group by语言group by state。
SQLAlchemy ResultsProxy and Pandas Dataframes | Python
联系pandas和sqlalchemy。
# import pandas
import pandas as pd

# Create a DataFrame from the results: df
df = pd.DataFrame(results)

# Set column names
df.columns = results[0].keys()

# Print the Dataframe
print(df)
Calculating Values in a Query | Python
Case Statement就是SQL中的case when。
Calculating a Difference between Two Columns | Python
You can use these operators to perform addition (
+), subtraction (-), multiplication (*), division (/), and modulus (%) operations.
这里和SQL有点区别。 在SQL语言中,如果我们要group一个新变量,通常我们不能用A-B as C中的C,而是复制粘贴A-B ,但是在sqlalchemy可以。 如order_by(desc('pop_change'))。
其次,.format可以这么在for loop中使用,
for result in results:
    print('{}:{}'.format(result.state, result.pop_change))

# Build query to return state names by population difference from 2008 to 2000: stmt
stmt = select([census.columns.state, (census.columns.pop2008-census.columns.pop2000).label('pop_change')])

# Append group by for the state: stmt
stmt = stmt.group_by(census.columns.state)

# Append order by for pop_change descendingly: stmt
stmt = stmt.order_by(desc('pop_change'))

# Return only 5 results: stmt
stmt = stmt.limit(5)

# Use connection to execute the statement and fetch all results
results = connection.execute(stmt).fetchall()

# Print the state and population change for each record
for result in results:
    print('{}:{}'.format(result.state, result.pop_change))
Determining the Overall Percentage of Females | Python
主要是case的应用。
# import case, cast and Float from sqlalchemy
from sqlalchemy import case, cast,Float

# Build an expression to calculate female population in 2000
female_pop2000 = func.sum(
    case([
        (census.columns.sex == 'F', census.columns.pop2000)
    ], else_=0))

# Cast an expression to calculate total population in 2000 to Float
total_pop2000 = cast(func.sum(census.columns.pop2000), Float)

# Build a query to calculate the percentage of females in 2000: stmt
stmt = select([female_pop2000 / total_pop2000* 100])

# Execute the query and store the scalar result: percent_female
percent_female = connection.execute(stmt).scalar()

# Print the percentage
print(percent_female)
其中,case(x, else_=y)中x表示筛选的条件和True情况下的对应值,y表示False情况下的对应值。 x用[]来框住, 其中可以用()来表示一个条件, ()用,分开且命题, ,的前方是ifelse命题,后方是True情况下的对应值。
这种逻辑写法比sql好,是因为: 最终反映的是select A from B的问题, 但A的选择和计算是重点,直觉上也是最先要解决的,因此按照sqlalchemy的逻辑, 我们先第一了A=emale_pop2000 / total_pop2000中emale_pop2000,再定义total_pop2000。
func.sum看到不要紧张,就是SQL里面的sum()。
SQL Relationships | Python
select_from和.join()实现SQL的JOIN操作。 其中,.join()中包含a.columns.x = b.columns.x类似于SQL中的ON条件。
Automatic Joins with an Established Relationship | Python
自动链接,就是SQL中的select A, B。
# Build a statement to join census and state_fact tables: stmt
stmt = select([census.columns.pop2000, state_fact.columns.abbreviation])

# Execute the statement and get the first result: result
result = connection.execute(stmt).first()

# Loop over the keys in the result object and print the key and value
for key in result.keys():
    print(key, getattr(result, key))
对于for loop的解释,这里相当于dict般处理。
<script.py> output:
    pop2000 89600
    abbreviation IL

# Build a statement to select the census and state_fact tables: stmt
stmt = select([employees, sales])

# Add a select_from clause that wraps a join for the census and state_fact
# tables where the census state column and state_fact name column match
stmt = stmt.select_from(
    census.join(state_fact, census.columns.state == state_fact.columns.name))
这里,如果两个表没有重复col,那么就不需要打上标签,xxx.clolumns.xxx。
Working with Hierarchical Tables | Python
self reference ,比如manager和employee的关系。 alias就是用于自引的。
Using alias to handle same table joined queries | Python
The
.alias()method, which creates a copy of a table
# Make an alias of the employees table: managers
managers = employees.alias()

# Build a query to select manager's and their employees names: stmt
stmt = select(
    [managers.columns.name.label('manager'),
     employees.columns.name.label('employee')]
)

# Match managers id with employees mgr: stmt
stmt = stmt.where(managers.columns.id == employees.columns.mgr)

# Order the statement by the managers name: stmt
stmt = stmt.order_by(managers.columns.name)

# Execute statement: results
results = connection.execute(stmt).fetchall()

# Print records
for record in results:
    print(record)
这里的.label()类似于修改名字,新尝试的joined表中col新名字。
Dealing with Large ResultSets | Python
fetchmany()可以解决output很多行的问题。
Working on Blocks of Records | Python
while的意思?这个例子很好,主要用于循环。 Python While 循环语句 | 菜鸟教程
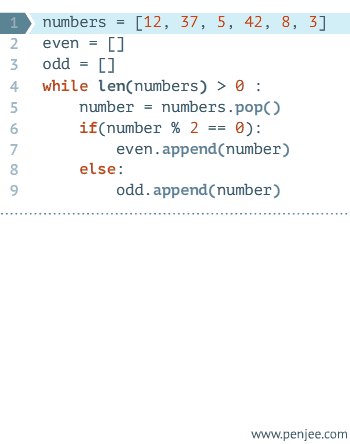
然后看整体的代码。
# Start a while loop checking for more results
while more_results:
    # Fetch the first 50 results from the ResultProxy: partial_results
    partial_results = results_proxy.fetchmany(50)

    # if empty list, set more_results to False
    if partial_results == []:
        more_results = False

    # Loop over the fetched records and increment the count for the state
    for row in partial_results:
        if row.state in state_count:
            state_count[row.state] += 1
        else:
            state_count[row.state] = 1

# Close the ResultProxy, and thus the connection
results_proxy.close()

# Print the count by state
print(state_count)
这里的.fetchmany(50)和.fetechall()性质相同,只是每次循环,只反馈50行。 while下的每个缩进行表示步骤的递延。具体地, 先完成partial_results = results_proxy.fetchmany(50), 再完成if条件, 最后完成for的子循环。
其中if判定,当partial_results为空时,总有那么一天,毕竟results_proxy有限。 more_results = False作为命令,停止while条件。
for循环中,state_count是一个空字典。 通过增加state_count[row.state]使得循环进行下去。
最后关闭results_proxy.close()
Creating Tables with SQLAlchemy | Python
学会建立table。
# Import Table, Column, String, Integer, Float, Boolean from sqlalchemy
from sqlalchemy import Table, Column, String, Integer, Float, Boolean

# Define a new table with a name, count, amount, and valid column: data
data = Table('data', metadata,
             Column('name', String(255)),
             Column('count', Integer()),
             Column('amount', Float()),
             Column('valid', Boolean())
)

# Use the metadata to create the table
metadata.create_all(engine)

# Print table details
print(repr(data))
from sqlalchemy import Table, Column, String, Integer, Float, Boolean表示table能够用到的数据属性。
Table之前用到的函数, 既可以用于存在的table, 也可以用于新建table。 只需要修改autoload 和autoload_with的参数。
Column('name', String(255))表示新建一个name名字的变量,且文本最大255个字符。
.create_all()是新建表格的骚操作,记住。
Table('data', metadata,中'data'是表名
In [2]: metadata
Out[2]: MetaData(bind=None)
这个不是很懂,但是不强求。
In [3]: engine
Out[3]: Engine(sqlite:///:memory:)
所以前前后后,发现并没有特定data这个Table()进行创建表格,和SQL中的语言不同create table。
Constraints and Data Defaults | Python
书签,这个地方,建表不是特别懂了。
Inserting Multiple Records at Once | Python
# Build a list of dictionaries: values_list
values_list = [
    {'name': 'Anna', 'count': 1, 'amount': 1000.00, 'valid': True},
    {'name': 'Taylor', 'count': 1, 'amount': 750.00, 'valid': False}
]

# Build an insert statement for the data table: stmt
stmt = insert(data)

# Execute stmt with the values_list: results
results = connection.execute(stmt, values_list)

# Print rowcount
print(results.rowcount)
这里的values_list就是增加项目。
Loading a CSV into a Table | Python
We have used the
csvmodule to set up acsv_reader, which is just a reader object that can iterate over the lines in a given CSV file - in this case, a census CSV file. Using theenumerate()2 function, you can loop over thecsv_readerto handle the results one at a time. Here, for example, the first line it would return is:
0 ['Illinois', 'M', '0', '89600', '95012']
0is the idx - or line number - while['Illinois', 'M', '0', '89600', '95012']is the row, corresponding to the column names'state','sex','age','pop2000'and'pop2008'.'Illinois'can be accessed withrow[0],'M'withrow[1], and so on. You can create a dictionary containing this information where the keys are the column names and the values are the entries in each line. Then, by appending this dictionary to a list, you can combine it with aninsertstatement to load it all into a table!
# Create a insert statement for census: stmt
stmt = insert(census)

# Create an empty list and zeroed row count: values_list, total_rowcount
values_list = []
total_rowcount = 0

# Enumerate the rows of csv_reader
for idx, row in enumerate(csv_reader):
    #create data and append to values_list
    data = {'state': row[0], 'sex': row[1], 'age': row[2], 'pop2000': row[3],
            'pop2008': row[4]}
    values_list.append(data)

    # Check to see if divisible by 51
    if idx % 51 == 0:
        results = connection.execute(stmt, values_list)
        total_rowcount += results.rowcount
        values_list = []

# Print total rowcount
print(total_rowcount)
我的感觉是, 因为是要上传.csv文件,因此要用到csv包中的csv_reader函数,作用就是一行行的阅读.csv文件中的数据。 enumerate()顾名思义,就是用于loopcsv_reader的操作。 for idx, row in enumerate(csv_reader):,这里的row就是标记了csv_reader文件的具体位置。
而且这里进行proxy编译的时候直接说出了目的, 比如要select,那么就是select([xxx]), 比如要insert,那么就是insert([xxx])。
Updating Data in a Database | Python
update功能就是在原表基础上修改。
The update statement is very similar to an insert statement, except that it also typically uses a where clause to help us determine what data to update.
stmt = update(employees).values(wage=100.00)中, wage不需要specify,加上employees.columns., wagecol都是100.00值了。 .values()中的更新不需要双等号==。
Correlated Updates | Python
实际上,我没理解这和Correlated Updates有什么关系,但是可以直接理解代码。就是把一个col的数据update到一个目标表的col去。
# Build a statement to select name from state_fact: stmt
fips_stmt = select([state_fact.columns.name])

# Append a where clause to Match the fips_state to flat_census fips_code
fips_stmt = fips_stmt.where(
    state_fact.columns.fips_state == flat_census.columns.fips_code)

# Build an update statement to set the name to fips_stmt: update_stmt
update_stmt = update(flat_census).values(state_name=fips_stmt)

# Execute update_stmt: results
results = connection.execute(update_stmt)

# Print rowcount
print(results.rowcount)
fips_stmt = select([state_fact.columns.name])这里可以理解为 select name from state_fact。
fips_stmt = fips_stmt.where(
    state_fact.columns.fips_state == flat_census.columns.fips_code)
可以理解为接上前面的代码加上 where state_fact.fips_state = flat_census.fips_code,这里flat_census是另外一张表。
update_stmt = update(flat_census).values(state_name=fips_stmt)可以理解为 给flat_census这张表中的state_name重新赋值,赋值规则上面两条应该解释清楚了。
Removing Data From a Database | Python
这里的delete和update一样都是增删原表,因此配合where条件使用。 .drop(engine)就是完全删除了,导致.exist(engine) == False。 drop_all()就是完全删除了所有的表。
Census Case Study | Python
开始案例分析了。
Build a Query to Determine the Average Age by Population | Python
# Import select
from sqlalchemy import select

# Calculate weighted average age: stmt
stmt = select([census.columns.sex,
               (func.sum(census.columns.pop2008 * census.columns.age) /
                func.sum(census.columns.pop2008)).label('average_age')
               ])

# Group by sex
stmt = stmt.group_by(census.columns.sex)

# Execute the query and store the results: results
results = connection.execute(stmt).fetchall()

# Print the average age by sex
for result in results:
    print(result.sex, result.average_age)
这里复习一下。results是一个数据表了。 Python中多使用for loop展示数据。result只不过是一个系数,不重要。
Build a Query to Determine the Difference by State from the 2000 and 2008 Censuses | Python
因为这个地方,'pop_change'是自己新建的,所以不需要加census.columns.。
Statement of Accomplishment
证书